Monday, February 20, 2012

Beachcombing

This past weekend here on Andros was breath taking. There wasn't a cloud in the sky, nor a single ripple in the ocean. I simply had to get out of the house and enjoy the day at the beach. I'm not one to just lay out and tan, sp I decided to scout for seashells to pass some time. I constantly need shells for my crafting, so I can never have too many.

I managed to bring home a good amount of treasures in excellent condition. I soak each of my shells in hot water and scrub off any sand, scum, and algea that might be growing on the shell. I don't care to bleach my shells since it fades their natural colors.

While I had them outside to dry, I decided to pull out my camera to take a few pictures of them.


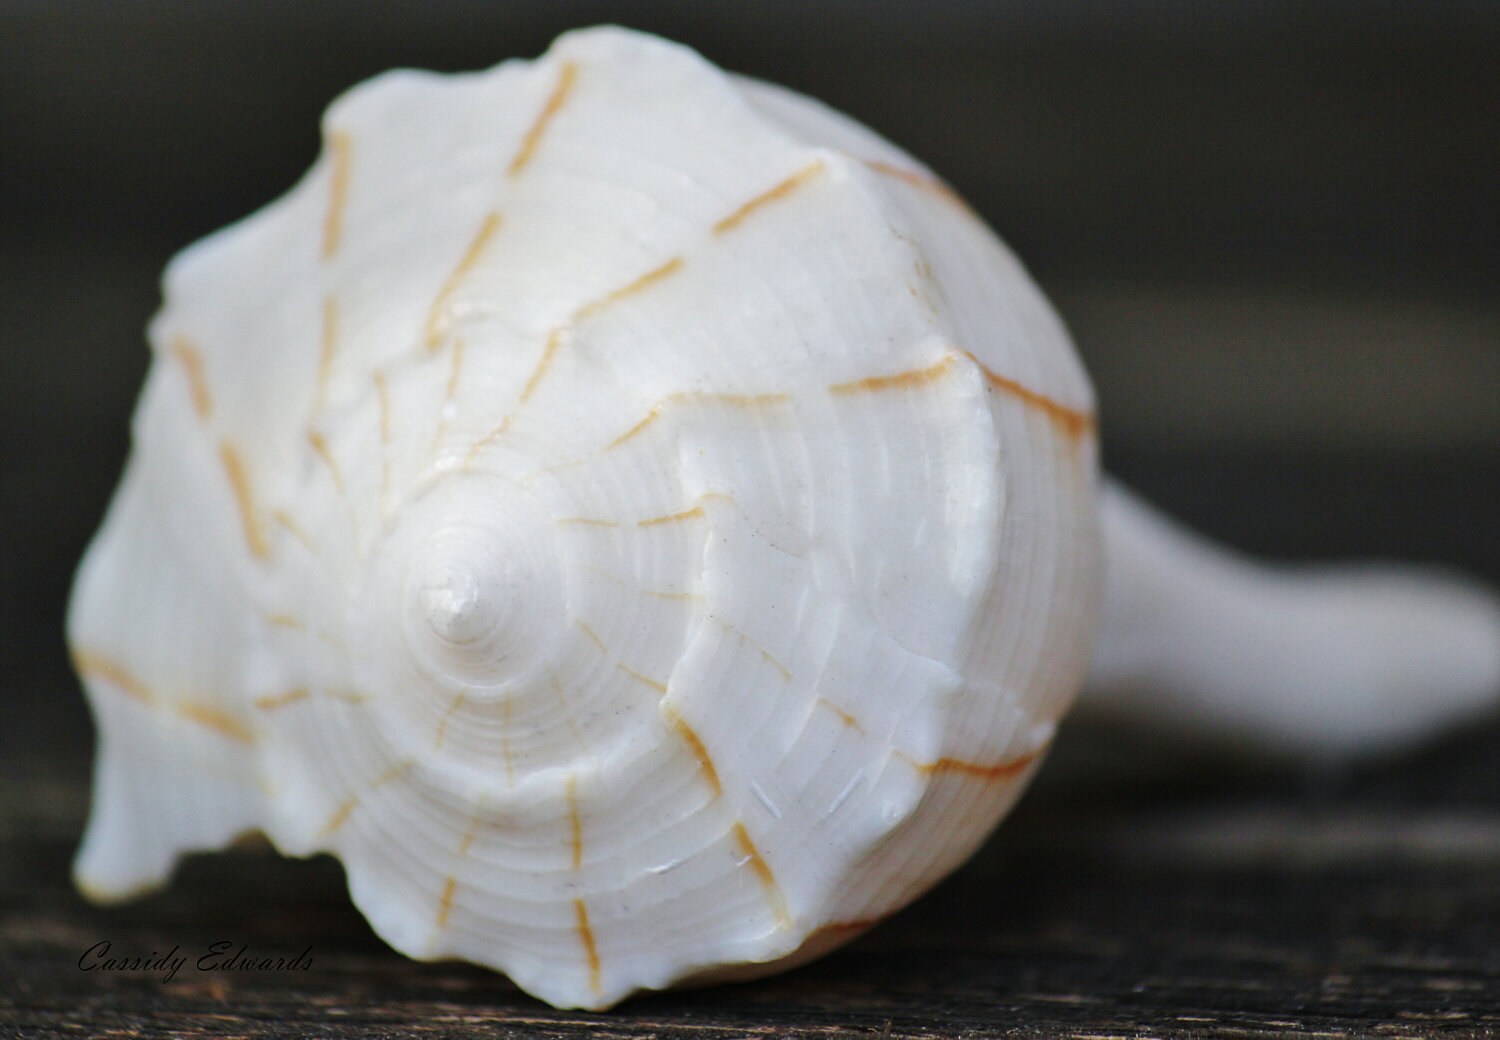
The first photograph I took is called a Lightning Whelk. For the background, I went with a darker shade of neutral wood to help the bright white shell stand out more.
Prints Available Here


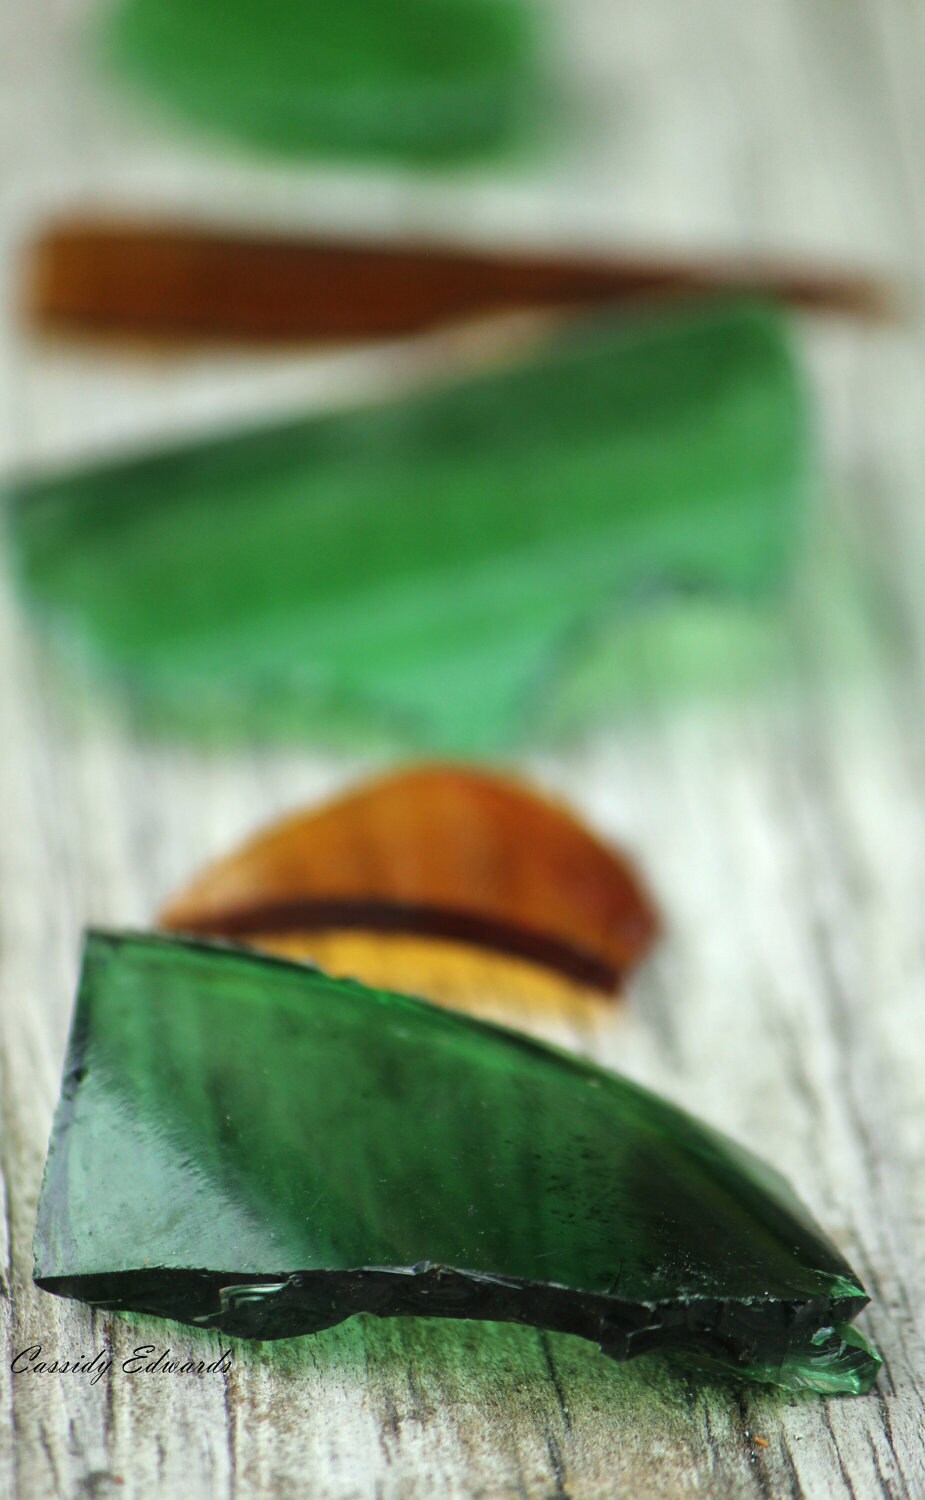
This second photograph here is glass I found on the beach. The glass hasn't quite reached the 'seaglass' stage yet, but it has been on the beach long enough for the edges not to be sharp. I went with a wood background again, but this time a lighter wood so the darker glass doesn't blend in too much.
Prints Available Here

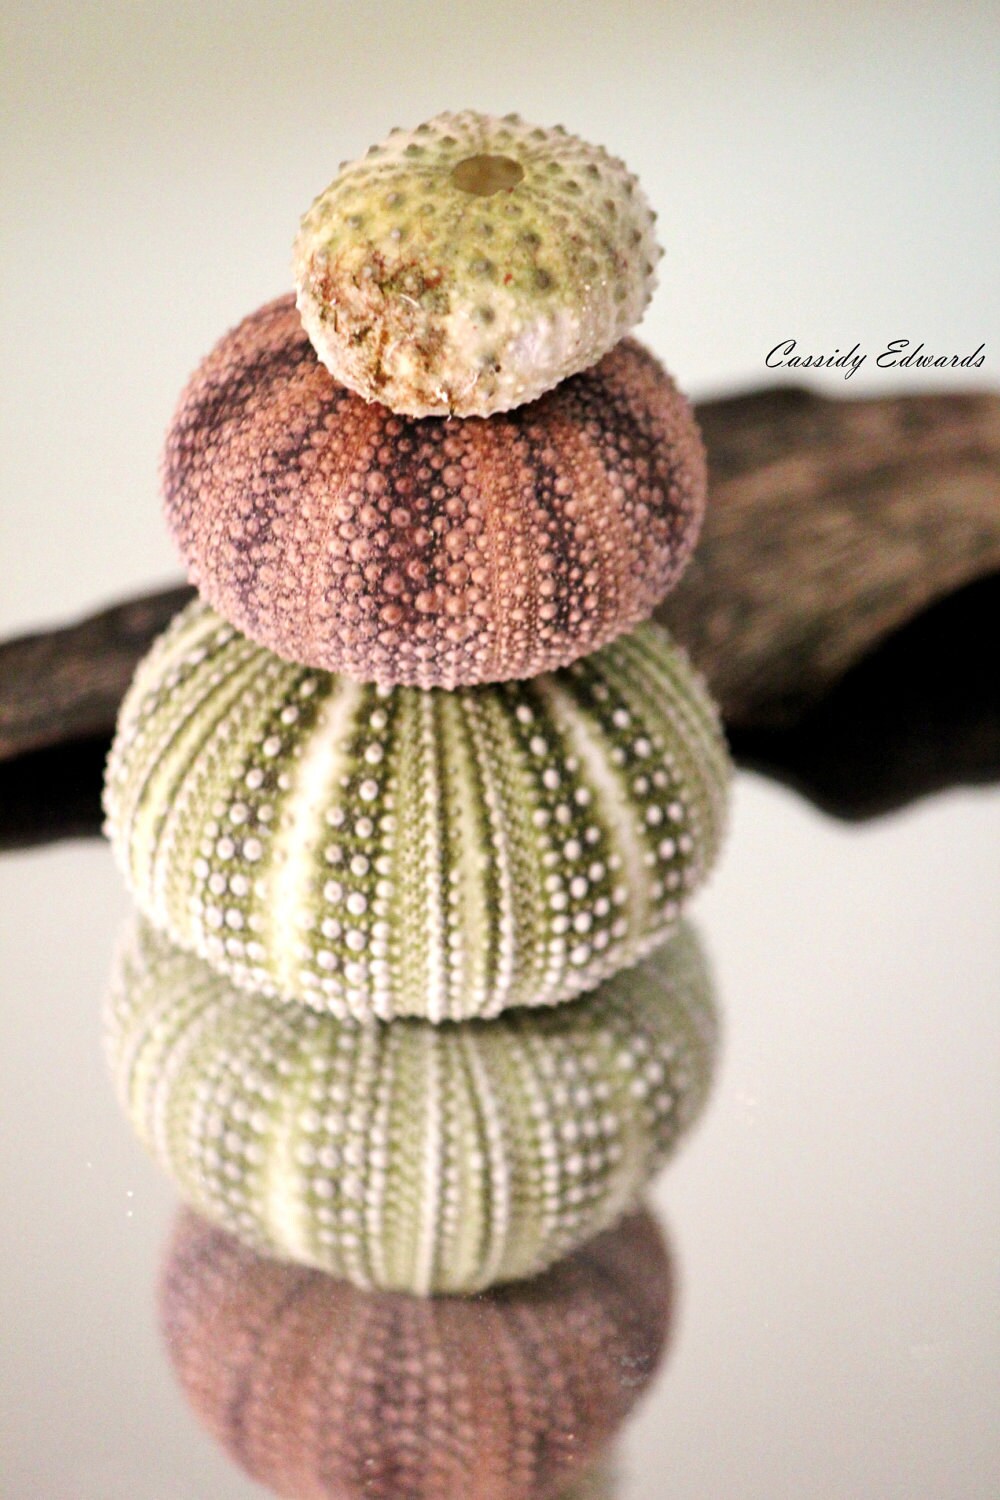
The last photograph I am featuring today is made from several different shades of sea urchin, and a piece of wood. I set everything on a mirror this time for a more interesting effect. I plan to experiment  more with mirrored photography in the near future.
Prints Available Here


have a separate shop on Etsy for my photography.

Please make sure to follow me on both Facebook and Pinterest for more information about my products.
 
 
My Etsy Handmade Crafts

Thursday, February 16, 2012

Photographing My Life

December of 2010, my husband and I decided we would invest in a nice camera for a mutual Christmas present. After some research, we decided on the Canon Rebel 2ti. We love it! We have been able to capture amazing moments from our daughter's childhood, and that is absolutely priceless.

Since then, I have read articles and books about photography. It has become sort of a new hobby of mine. Friends and family really enjoyed my work, and encouraged me to start selling prints. I was a bit hesitant at first, especially since I am no professional. I have sold 1 print so far, and hope to sell plenty more in the near future.

Most of my photographs are taken here on Andros Island, Bahamas. The island and it's contents are picture perfect! Picture blue skies, sandy white beaches, swaying palm trees, tropical flowers, and you have Andros! It truely is amazing what this island provides for us. I would like to share with you some of what I have taken:

Prints Available Here


Prints Available Here


Prints Available Here


I have a separate shop on Etsy for my photography.
Please make sure to follow me on both Facebook and Pinterest for more information about my produsts.


Etsy Crafts

Thursday, August 4, 2011

Halloween Craft Idea

Looking for Halloween craft ideas? Here's a fun and easy craft to add quick spooky flair to your home! Here's what you'll need:


Seashells of your choice, various sizes. Colors and imperfections don't really matter.
Marker - Color doesn't matter
Various orange paints
Black paint
Twigs
Magnets
Styrophoam

I used 3 seashells as an example, but you can use however many your would like. I usually pick the uglier shells out of my collection since it's going to be painted over - you aren't going to be able to see any blemishes on the shell. Do make sure you have cleaned off any sand and algea that might have been on the shell if you picked it up fresh off the beach, it tends to have a gritty look under the paint.

Cut out just enough styrofoam to pack into the back of each shell so you have something to attach the magnet to. Use a nice strong glue, I reccommend something a little bit stronger than hot glue or elmer's glue if you want it to last a long time, and glue it into the back of each shell.

With a marker, I drew out a classic Jack-o'-Lantern face on each shell. I usually use a marker to do this because I end up messing up if I just start with the paint. You can do the face however you like! I chose the classic smile to begin with, but please feel free to get more creative with it.

Once you have that finished, pull out the paints. I used a different shade of orange for each shell I painted, but you can use just one shade if you'd like. Mixing a tiny white or black will help you make different shades if you don't have any that you've purchased. Depending on how dark and thick the paint is, you may have to put a few extra coats on each shell to ensure that it is covered. Painting the back is optional. After that dries, fill in the black paint were you drew the face!

Now while that is drying, pull out your twigs. cut them down to your desired stem length. After the paint is completely dried, attach them to the top of your pumpkin as a stem. For an extra added touch, I made vines out of Polymer Clay and glued them next to the stem.

Lastly, glue your magnets to the stryofoam and your finished! Again, I would use a better glue than hot glue or elmer's. I know that was sort of a lengthy guide, but it's not fun. It's also totally kid friends, my little one had so much helping me make my set! Hope you had fun with this project.


Don't want to bother making them but want a set of your own? I have this set for sale on my Etsy Page!

 I also have many other Halloween theme listings currently For Sale at this link.

Saturday, July 23, 2011

Under the Sea

The island of the Bahamas I live on is Andros, which has the third largest reef in the world. The snorkling here is beyond amazing. A good friend of mine and myself decided to go, and I immediately kicked myself in the butt for not going sooner. It was more beautiful than you could ever imagine. Unfortunately I do not have an underwater camera, so I was unable to capture it's beauty. I do, however, have a 50gal salt water aquarium with wild fish to show you.

Damsel Fish (Jewelfish)

Pretty, isn't he? I found him while snorkling around some fire coral. I was pretty nervous, I didn't want to be stung by the coral! Catching the fish is quite difficult. I use a tiny net and swim after the fish, which almost enver works since the fish see me coming. Smart little creatures... I usually end up having to corner the fish up in a hole of some sort, which still ends up not working have the time. Here's another little guy in my tank.

Puffy Cheek Goby

That guy wasn't too hard to catch. They hang around in shallow waters, so I often find them trapped in tidal pools. We have several of them in our tank, and they eat just about anything. They are so much fun to watch...

So I decided to turn all of this excitement into productivity, and go on a magnet-making spree. Boy did I make a bunch, but in my defence, I had so much inspiration! Here's a little preview of what I came up with.

For Sale Here

Not bad, right? I think the little guy is adorable. I didn't see any jellyfish on my underwater adventure, but it was one of the first things that came to mind when I sat down with my clay.

I hand shape each of my magnets using no tools. After I get the desired shape, I bake in my oven at 275 degrees. I take them out, let them cool, and then (the most fun part) paint. Finally, it's coated with polyurethane for a nice gloss finish and magnets are attached to the back.

It's a long (but fun!) process, and it's definitely worth the wait for sure. Each magnet is one of a kind since I don't use molds. I do take requests, so if you have anything in mind please don't hesitate to Contact Me! Here is a recent custom order I have completed.

 I have plenty of other magnets here at This Link.

I had never attempted a mermaid before this request. Pretty good job for my first! Boy was she fun to make. Her shell bra is made from real seashells I have collected off the shores right here in the Bahamas. Of course, this lead to me making about a dozen more mermaids...


I think this has ended up being my longest post so far! Now, I just need to write here more often.  Again, be sure to follow me on Facebook and check my Etsy Shop, as I update those way more frequently than I do here. Until next time...

Thursday, June 16, 2011

Another Sunny Day

Like most every other day here in the Bahamas, it was basically impossible for me to stay inside. I loaded my daughter and myself up and went to the beach. The water was unbelievably calm, the sun was shining - it basically couldn't get any better than it was at that moment. Here's a speak-peak of what our experience was like.


She was quite content checking out what had been trapped in each natural pool as the tide went out. This allowed me to collect about a million seashells, each varying in shape, size and color - no two shells exactly the same!

We headed home, and I got her in bed for her nap just in time for the afternoon storms to roll in.  I had so much inspiration and motivation from our morning beach adventure that I immediately pulled out the needle and thread. Here is one of the numerous accessories I accomplished.


It reminds me of the Bahamian Sunshine... So powerful and intense, with such vibrant colors! I have already uploaded a few new hair accessories from this new batch, and I have so many more to post. Be sure to check back to my Etsy Page frequently, as I find myself adding new listings several times a week.

Be sure to follow us on both Flickr and Facebook if you aren't already!

Monday, May 30, 2011

Call me a dork, but I am so excited about finally starting a blog! For starters, I suppose I should introduce myself. My name is Cassidy Edwards, I live in the Bahamas, and I am a stay at home mom. As a hobby, I craft and sell my products on Etsy. I hope you enjoy browsing!

www.islandjunkie09.etsy.com

I find most of my inspiration from the beach. I also use seashells, sea glass, and driftwood that I pick up right from the shores here in the Bahamas. A great example of my Androsia Flower Hair Clips.

For Sale Here
To make these hair clips, I cut out a flower pattern in Androsia Fabric Scraps. Androsia is a hand batik fabric that the Bahamians make, and the only factory is located here on Androsia Island. After they sew clothes, they bag up their scraps and set them out for sale so they don't waste anything. I like to buy these scraps and use them for my projects, like these hair clips.

I layer tons of the colorful flowers that I have cut out and hand sew them on to a silver hair clip. The way they are layered allows the flowers to fluff out and gives it a cute poofy look.

That just about wraps things up for now. I really enjoyed writing this first post, so I can see this happening quite often! Hope you were interested enough in my product to click a few links! Be sure to check back soon!

 
Related Posts Plugin for WordPress, Blogger...